.png)
Contents:
- Introduction
- SMCIMPITool
- Using SMCIPMITool
- IPMI commands
- Network Configuration
- FRU
- BIOS Management
- Power Control
- KVM
- Other useful commands
- Command Line mode vs Shell mode
- Serial over LAN
- Server Group Managemet
- Conclusion
Introduction
In parts 1 & 2 of our IPMI How to series we looked at the setup of IPMI and how to use the Web GUI, as well as a first look at some powerful command line utilities. These parts can be found at the links below.
Part 1 - Setup and web GUI
Part 2 - IPMICFG
At Boston we are working closely with Supermicro to build bespoke server solutions which utilise the IPMI protocol standard. To recap, IPMI (Intelligent Platform Management Interface) is a powerful server monitoring protocol using a BMC (Baseboard Management Controller) chip embedded on server motherboards. Using IPMI is something every datacentre admin should be familiar with when using Supermicro hardware, as it allows one to fully manage a server remotely if they have an Internet/Network connection to the hardware.
Here, we will carry on with Command Line Interface (CLI) tools, with a focus on SMCIPMITool. Similar to IPMICFG that was mentioned in part 2, this is a tool which can configure and monitor IPMI features via command line. With CLI tools you can access some very powerful features of IPMI and in a quicker and more efficient way than logging into a web GUI, for example. The nature of command line interfaces means that you can quickly type commands and get an output for multiple systems remotely, using out of band tools such as SMCIPMITool.
SMCIPMITool
This is a particularly powerful tool for server admins. It is not to be confused with the standard IPMITool, which is an open-source BMC / IPMI management tool available to download for free and works with most vendors systems, assuming they operate to the IPMI standard. Supermicro have taken this open-source tool and modified it in a way to add additional functionality for their own hardware. This means you will get more features using SMCIPMITool with Supermicro hardware. An example of this could be something simple like event logs which may differ in detail depending on what which tool is used. To illustrate this, I pulled the event logs from the same server, first using IPMITool and then with SMCIPMITool; the results are shown in the below images in which the last 5 events are visible.

IPMITool (open-source version) Event Logs
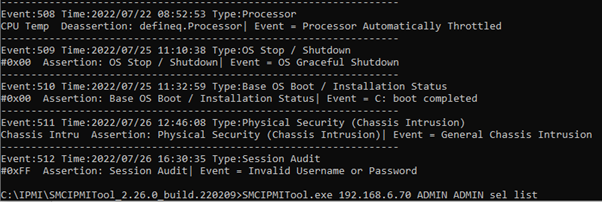
SMCIPMITool Event Logs
As you can see there is more detail in the SMCIPMITool version.
SMCIPMITool also adds other useful features including support KVM, virtual media, node manager (power supply / consumption control), HDD and RAID info, BIOS updates / IPMI updates, Blade management, CMM / Twin enclosure management – many, if not all of these, are not part of the IPMI standard, so they don’t exist in the standard IPMITool.
So, what are the reasons for using SMCIPMITool rather than IPMICFG? Let us say you wanted to access IPMI in the same way as we did for IPMICFG, but you want to do this remotely. SMCIPMITool makes this possible, offering an out-of-band connection so we can login to IPMI from anywhere. This means you can manage multiple systems all over the world from one location, all you need is a connection to the network that IPMI’s BMC is connected to. This could be a VPN connection, for example, and you would then need the IPMI IP address and login credentials for each server.
The utility can be downloaded from the below link. You then just need to open an Administrator Command Prompt (assuming Windows in this example) and navigate to the downloaded and extracted files. The Linux version is also included in the same download. https://www.supermicro.com/wdl/utility/SMCIPMItool/
Using SMCIPMITool
The basic syntax for SMCIPMITool is as follows:
SMCIPMITool <IP> <username> <password> <commands ... >
To get a full list of commands available you can simply type in the above but without any command parameter. For example, a server with IPMI address 10.6.0.19 and a username/password of ADMIN/ADMIN you would type:
SMCIPMITool.exe 10.6.0.19 ADMIN ADMIN
This would output a full list of commands available, as seen in the image below.

List of SMCIPMITool commands
A good tip is to then type a command to see the further subcommands available. This can be done for each of the commands shown above and will present further options. You can drill down further too to see even more sub commands. For example, you can use command ‘ipmi’ to see the ipmi options then ‘ipmi power’ to see the sub options (for power control).
Now we will look at some useful commands in SMCIPMITool.
IPMI commands
Using the ipmi command presents the following sub options:
sensor [--full] Sensor status
power Power control
acpi ACPI status
lan LAN configuration (13)
fru FRU information
fruw <field> <value> Write FRU
frubackup <filename> Backup FRU information
frurestore <filename> Restore FRU information
oem OEM Commands (22)
reset Perform BMC cold reset
fd <option> Perform BMC factory default
ver IPMI device version
delsdr <SDR record ID> Delete SDR
sessioninfo Session Info
fan [mode] Get/Set Fan Mode
flash <filename> Flash SIM IPMI firmware
flashw <filename> [Preserve_opt] Flash SIM(W) IPMI firmware
flashr <filename> Flash Renesas (X9&B9,*.ima) IPMI firmware
flashh <filename> [Preserve_opt] Flash Hermon (X8&X9,*.bin) IPMI firmware
flasha <filename> [Preserve_opt] Flash ASPEED (X10, X11 and later,*.bin) IPMI firmware
flashrf <filename> [Preserve_opt] Flash ASPEED (X12 and later,*.bin) IPMI firmware
uflash <filename> [Preserve_opt] Universal IPMI firmware flash command support X10 and later
raw <netFn> <cmd> [data] Send IPMI raw command
ipmb <ch> <addr> <netFn> <cmd> ... Send IPMB raw command
ipmboem <ch> <addr> <netFn> <cmd> ... Send IPMB(OEM) raw command
watchdog Watchdog timer commands (3)
IPMI Network Configuration
As we need the IP address to use SMCIPMITool, this utility wouldn’t typically be used during initial IPMI setup but is useful if any changes need to be made such as changing from the default DHCP to a static IP. The command to get into this section is ‘ipmi lan’, and using this will present the following list of options:
ip [ip] Get/Set IP. Format:###.###.###.###
mac [mac] Get/Set MAC. Format:##:##:##:##:##:##
gateway [gateway_IP] Get/Set gateway. Format:###.###.###.###
netmask [netmask] Get/Set netmask. Format:###.###.###.###
snmp [<seq> <ip> [mac] [on/off]] Get/Set SNMP destination
snmpcomm [community string] Get/Set SNMP community string
arp [on|off] On/Off Gratuitous ARP
dhcp [enable|disable] Enable/Disable DHCP
vlan [<enable|disable> <tag>] Display/Enable/Disable VLAN
dns [<Pri._IP> <Sec._IP>] Get/Set DNS server (OEM)
protocol [protocol status] Get/Set IP protocol
ipv6 IPV6 settings (8)
linkStatus Link Status Infos
You can see some of the useful commands below, where I check the IP, set a new one (the same IP just for this example purposes), check the gateway address and DHCP status.

SMCIPMITool commands
IPMI FRU
FRU is used for asset management and serial numbers for server hardware. We can check FRU entries with the ‘fru’ command. To view all current entries, use the command:
SMCIPMITool.exe 10.6.0.19 ADMIN ADMIN ipmi fru

Viewing the FRU entries
To write a command, the 'fru' command needs to be invoked followed by the field you want to edit and the value. For example, changing the Product Name (PN) would look like:

Editing a FRU entry, in this case the Product Name.
It is also possible to backup and restore FRU entries with the ‘frubackup <filename>’ and ‘frurestore <filename>’ commands.
BIOS Management
A very useful feature of SMCIPMITool is to check the current BIOS version and also to update to a newer firmware that’s been downloaded from the Supermicro website. Run the ‘bios’ command to see the list of options here:
isActivated Check if Node product key (SFT-OOB-LIC) activated
update <filename> [options] Update BIOS (options:-N -R -MER suggested)
rfupdate <filename> [options] Update BIOS via Redfish (For X12 and later)
ver Check BIOS info
image <filename> Check BIOS image file
setKey <ProductKey> Activate Node product key (SFT-OOB-LIC) for BIOS update
setKeys <file> Activate Node product keys (SFT-OOB-LIC) for BIOS update
getMACs <start> <end> <netMask> Collect MAC addresses into file
<file> [<username> <password>]
To update the BIOS from SMCIPMITool use the ‘bios update’ command. In the below example, I checked the current BIOS version with ‘ver’, then read the image file of my downloaded .bin BIOS file to make sure it’s a newer version and finally ran the command to update the BIOS from 3.5 to 3.6. A very useful feature, especially if you have multiple systems to update. This feature requires an Out-Of-Band license from Supermicro which will unlock a few additional features, of which a BIOS update is perhaps the most useful.

Updating the BIOS
A server reboot is required after a BIOS update, which leads us into the next section.
IPMI Power Control
Typical power control options are available such as checking the status, resetting, and shutting down, as well as including a boot option so the next reboot will boot to a selected device. As we just updated the BIOS, here is a good time to show you how to use the ‘ipmi power’ commands to set the boot option to 4 (boot to BIOS), perform a software shutdown, check the power status and then finally power the server back up. In the below screenshot after the server restarted, I used ‘bios ver’ to check that the BIOS had indeed updated to 3.6.

Rebooting with SMCIPMITool after a BIOS update
If you wanted to launch a screen output whilst the system is rebooting to check the progress this is also possible with SMCIPMITool, and we will go through those commands next.
KVM
As you know from our previous article in this series, IPMI features full server keyboard, video and mouse controls, allowing you to remotely view the screen and take control of the server. There are a few options in SMCIPMITool:
ukvm General KVM launcher
kvm SIM KVM console (graphic mode)
kvmw SIM(W) KVM console (graphic mode)
kvmwa SIM(WA) KVM console (graphic mode)
kvmwx9 SIM(X9) KVM console (graphic mode)
Some of these depend on the platform of the server, so in most cases the best option to use is ‘ukvm’:
SMCIPMITool.exe 10.6.0.19 ADMIN ADMIN ukvm


Launching the Java KVM console from command line
The HTML5 console may be the preferred option, and this can be launched with the html5 modifier:
SMCIPMITool.exe 10.6.0.19 ADMIN ADMIN ukvm -html5
This will change the mode from Java to HTML and launch the console.


Launching the HTML5 console from command line
Other useful commands
There are a lot of commands to configure and monitor many server aspects. A good way to see other features is to use the generic command such as ‘SMCIPMITool.exe 10.6.0.19 ADMIN ADMIN’ and then try different options to drill down and see what else can be configured.
Some useful commands:
SMCIPMITool.exe 10.6.0.19 ADMIN ADMIN sel list – This shows the IPMI event log
SMCIPMITool.exe 10.6.0.19 ADMIN ADMIN ipmi sensor – View the status of the sensors in the server such as temperatures, fan speeds and voltages.
SMCIPMITool.exe 10.6.0.19 ADMIN ADMIN user – Manage user privileges with add/remove/edit features included.
SMCIPMITool.exe 10.6.0.19 ADMIN ADMIN wsiso mount 192.168.20.100 /iso/linux.iso – command to mount an iso file that is stored on a shared network storage (located at 192.168.20.100 in the above example). ‘wsiso status’ is used to check if anything is currently mounted and ‘umount’ will unmount the iso file.
SMCIPMITool.exe 10.6.0.19 ADMIN ADMIN hwinfo – will display the current installed hardware components.
Command Line mode vs. Shell mode
As you have seen so far, we can run commands in the ‘SMCIPMITool.exe 10.6.0.19 ADMIN ADMIN’ format, but there is also a shell mode where commands can be entered without exiting SMCIPMITool. Once in shell mode we can run commands without typing the servers IP and password each time. To get into Shell mode type in:
SMCIPMITool <IP> <username> <password> shell
In the below screenshot I have entered shell mode and then typed some commands (‘ipmi power status’, ‘ipmi ver’ and ‘ipmi lan ip’) without having to use the executable, IP or user credentials each time. This is a useful feature to work faster.

SMCIPMITool Shell mode
Serial over LAN
Another supported feature of SMCIPMITool is Serial over LAN. This is a very low bandwidth way to get to text only interfaces such as the BIOS terminal or a command line based OS KVM. Serial over LAN (SOL) can only be run from the command line in a Linux based OS, but in Windows you need to run this from Shell mode as described in the previous section. After entering the Shell mode, the ‘sol’ command displays the list of sub options:
sol activate Activate SOL (Press F12 to exit)
sol deactivate Deactivate SOL
sol window Open SOL window GUI and activate SOL
sol key [linux|windows] Key mapping for linux or windows
sol bitrate [9.6|19.2|38.4|57.6|115.2] Configure SOL bit rate
sol retryCount [count] Configure SOL retry count
sol retryInterval [interval] Configure SOL interval in millisecond
‘sol activate’ will work in Linux but for Windows Command Prompt we must use the command ‘sol window’ and this will open a separate SOL window.

Launching Serial over LAN window in Windows via SMCIPMITool
Server Group Management
Things get even more interesting with group management. This makes things easier if you are managing multiple systems and need to run the same commands across various servers.
The ‘host’ command can be used to define server groups, and will show sub commands:
List List host data
Reload Reload host data
add <host> <ip> [username] [password] Add a host
remove <host> Remove a host
rename <old name> <new name> Rename a host
group Host group data management (5)
With ‘host group’ having further sub commands:
add <group> [host] ... Add a host group
remove <group> Remove a host group
rename <old name> <new name> Rename a host group
addhost <group> <host> ... Add a host into group
removehost <group> <host> ... Remove a host from group
So firstly, we want to add some hosts and then add them to a group. This will then allow us to run commands on the created group.
Let’s say we have 3 servers that need to be managed as a group, I will name them Server1, Server2 and Server 3. These are on 10.2.99.1, 10.2.99.2 and 10.2.99.3 respectively.
For this we will use the ‘host add’ command as below:
SMCIPMITool.exe 10.6.0.19 ADMIN ADMIN host add “Server 1” 10.2.99.1 ADMIN ADMIN
(The quotation marks are only needed if you have any spaces in the server’s name)
Note the 10.6.0.19 address is irrelevant here, I’m just using that to target the other servers to add them to the group. The grouping of servers is saved as a configuration file in the same folder where you saved the SMCIPMITool utility . The above commands would have the same outcome if we used any other server with IPMI to run the commands from.
After we add the other 2 servers, the command ‘host list’ will confirm this has been done correctly.

Adding Hosts using SMCIPMITool
Now we need to create a group with the ‘host group add’ command and give it a name :
SMCIPMITool.exe 10.6.0.19 ADMIN ADMIN host group add "Group 1"

Creating a Group
Next is to begin adding hosts to the newly created Group 1. This is done with the ‘addhost <group> <host> ’ command:
SMCIPMITool.exe 10.6.0.19 ADMIN ADMIN host group addhost "Group 1" "Server 1"

Adding the Hosts to the newly created Group 1
Ok now that hosts have been named and added to a group, we can now run some commands on all 3 servers. Not only that, but we can also run commands on individual hosts using their host name (such as “Server 1”). Using host names allows for quick commands. The command for this is ‘hostrun <host|group> <command>’
For example, the below command will check the BIOS version for all servers in “Group 1”
SMCIPMITool.exe 10.2.99.1 ADMIN ADMIN hostrun "Group 1" bios ver

Checking the BIOS version of 3 servers with 1 command
To simplify commands further, let us also use the ‘shell’ command. The below screenshot shows the command to invoke the Shell, before checking the power status of the servers in Group 1 using ‘hostrun’ and the ‘ipmi power status’ commands:

SMCIPMITool Shell mode
Another example, the below screenshot shows how to create a new IPMI Operator called ‘Test’ across the 3x servers in ‘Group 1’, using ‘hostrun’ and ‘user add’ commands in the Shell:

SMCIPMITool command using Shell mode on a group of servers.
Clearly this is a powerful feature, and you can run every SMCIPMITool command in this way. Having defined hostnames also speeds up commands. Let’s say I want to get the serial number from Server 1. In the command shell I could simply type:
hostrun "Server 1" ipmi fru
This will give me the fru information including the serial for this server. I have no need for the IP address or username and password, which makes things much simpler and speeds up server administration.
Conclusion
The command line based IPMI utilities are powerful tools for server management. Hopefully this guide has given you a good starting point for using SMCIPMITool. My advice would be to have a play around with the commands list to see what else each tool can do. It’s certainly something that will speed up server administration! For further reading on IPMI you can check out Part 1 in this series (IPMI Setup and Web GUI) as well as part 2 here. Look out for further entries in the series coming soon…
To learn more about servers with IPMI solutions and even test drive a solution yourself, please get in touch by emailing [email protected] or call us on 01727 876100 and one of our experienced technical engineers will gladly guide you through building the perfect solution just for you.
Author:
Sukhdip Mander,
Field Application Engineer, Boston Limited
Downloads:
https://www.supermicro.com/wdl/utility/SMCIPMItool/
Previous tutorials in this series:
https://www.boston.co.uk/blog/2022/02/09/supermicro-ipmi-how-to-series-part-one.aspx
https://www.boston.co.uk/blog/2022/08/31/supermicro-ipmi-how-to-series-part-two.aspx
Further Reading:
https://www.boston.co.uk/blog/2019/07/24/ipmi-best-security-practices.aspx
https://www.boston.co.uk/blog/2019/06/17/ipmi-user.aspx